We are using Logstash for our log management.
We integrated logstash with ElasticSearch, and Kibana UI.
However it does not work very well to us. So we were looking for possible tools to visualize the logs without much work.
Finally, we decided to use Loggly. Then we just follow the steps provided by loggly in their documentation. Unfortunately it does not work for Logstash version 1.5. After spending few hours, we made it work. Here are the steps.
Install Loggly Plugin
Since Logstash version 1.5, there is a new plugin management system. To install a Logstash Loggly plugin, use the following command:
sudo bin/plugin install logstash-output-loggly
Create Logstash configuration
Create a logstash-loggly.conf file with following contents
output{
   loggly{
      key => "TOKEN"
      host => "logs-01.loggly.com"
      proto => "https"
   }
}
where TOKEN - your customer token from the source setup page
You can place this file under /etc/logstash/conf.d/.
Restart the Logstash
Restart Logstash to send the files to Loggly.
It may take a few minutes to index the event. If it doesn’t work, you can see /var/log/logstash/logstash.err.
We used to work on more than one post at a time and publish them in future.
So you just want to test them while writing the blog, but you don't want publish
them to your live blog immediately. There are 3 different ways to achieve this in jekyll.
1. With published settings
You can include a line in your post meta data to indicate whether a post is published or not:
(or)
Set published to false if you don’t want a post to show up when the site is generated.
To preview your site locally, you can --unpublished option
jekyll server --unpublished
When you want to make the post to live, just remove the published flag or set it to true.
2. With future dated posts
You can write your blogs with future dated. There is a setting which does something similar - show future dated posts.
To preview your site locally, you can --future option
Make sure that you have following setting in your _config.yml file.
This will hide future dated posts from your live blog.
3. With drafts folder
As you know, Drats are the posts you’re still working on and don’t want to publish yet.
To get up and running with drafts, create a _drafts folder in your site’s root.
You can place your posts inside the drafts folder.
- _drafts/
  - my-draft-post.md
To preview your site locally, you can --drafts option
Make sure that you have following setting in your _config.yml file.
This will hide drafts posts from your live blog.
When you want to publish the post to live blog, move your post from _drafts to _posts folder.
I recommend drafts folder for upcoming posts. Because it is much cleaner and easy
to maintain when you work with team. If you have any other tips, share it on comments.
JAWS is a stack from Amazon web services(AWS) to ease the development of
massive scalable web applications.
It is trying to solve important problems in scalable web application development.
1. No Backend servers: All web and mobile application needs backend server and
database server. Since the JAWS back-end is comprised entirely of AWS Lambda Functions,
you don't need to write your back end server in Node, Ruby, PHP or python.
A back-end comprised of Lambda functions comes with a ton of concurrency and
you can easily enable multi-region redundancy. So there is no need for
scaling/deploying/maintaing/monitoring servers again.
2. Cheap: Lambda functions run only when they are called, and you only pay for when they are run.
You can build your app using following AWS services
- Lambda - Build worker tasks that you can spawn and scale infinitely.
- DynamoDB - Managed, NOSQL data storage
- API Gateway - Launch an API with urls pointing to your Lambda functions.
- S3 - Host static assets for your site.
Architecture
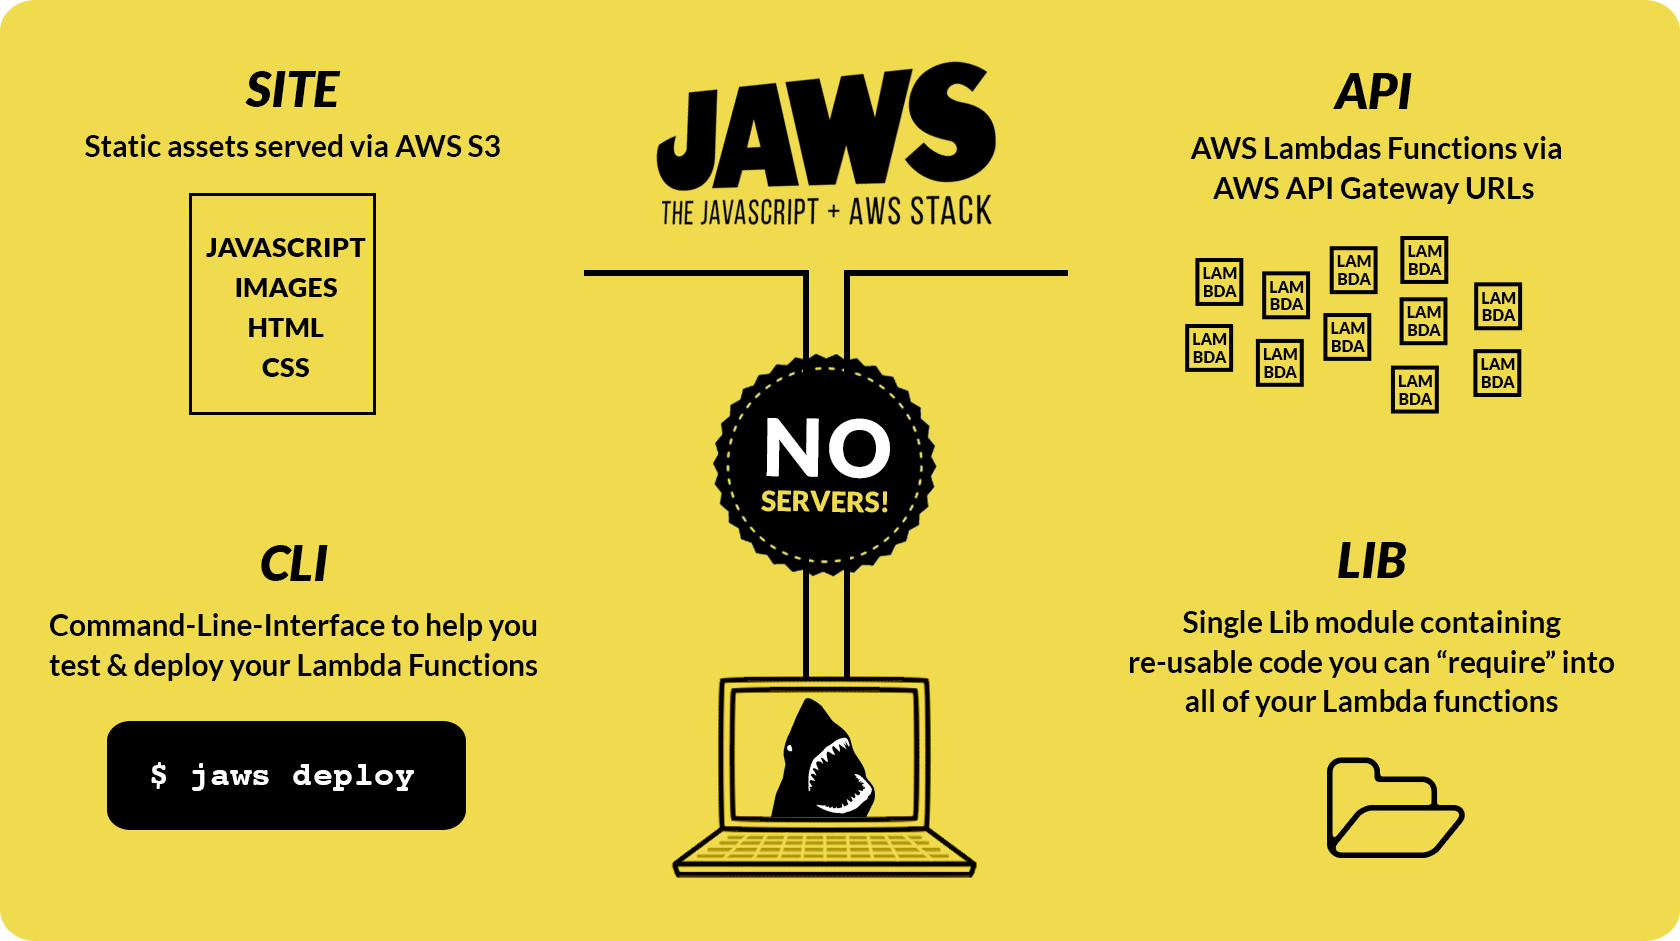
API
As we know, there is no backend servers. Everything is written as Lambda functions.
In normal backend server, we used to write controller to handle the routes. Similarly,
each of your API URLs points to one of these Lambda functions and they are completely
isolated from each other enabling you to develop/update/configure/deploy/maintain
code for specific API urls at any time without affecting other parts.
You can either use the AWS Management Console's API Gateway User Interface to create your API, or define your API in the api_swagger.json file and deploy instantly via AWS's Swagger Import Tool .
Lib
The lib folder/module contains re-useable code you can use across all of your Lambda functions, which can be thought of as your Models. It's an npm module that can be required into your Lambda functions, like any other.
You can can require in only the code that your Lambda function needs.
// This only loads code needed for the User Model
var ModelUser = require('jaws-lib').models.User;
This way, all of the changes in the lib folder will be instantly available in every one of your Lambda functions when you run/test them locally.
CLI
The stack comes with command line tool to test locally and deploy.
# Run A Lambda Function Locally
jaws run

# Deploy A Lambda Function
jaws deploy

# Start A Local Server from site folder
jaws server
The static assets can be uploaded and served from S3 for super fast response times.
Definitely JAWS saves lot of development time. You can try and let me know your comments
and feedbacks.
